The Arduino Yun
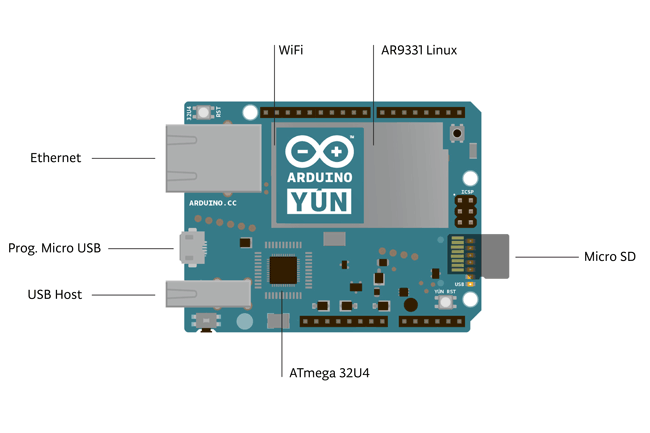
The Arduino Yún is a microcontroller board based on the ATmega32u4 (datasheet) and the Atheros AR9331. The Atheros processor supports a Linux distribution based on OpenWrt named OpenWrt-Yun. The board has built-in Ethernet and WiFi support, a USB-A port, micro-SD card slot, 20 digital input/output pins (of which 7 can be used as PWM outputs and 12 as analog inputs), a 16 MHz crystal oscillator, a micro USB connection, an ICSP header, and a 3 reset buttons.
The ATmega32u4 is the same processor used in the Arduino Leonardo
What this means is has two microcontrollers on it.
The Yún distinguishes itself from other Arduino boards in that it can communicate with the Linux distribution onboard, offering a powerful networked computer with the ease of Arduino. In addition to Linux commands like cURL, you can write your own shell and python scripts for robust interactions.

Linux handles the USB Host, the SD card, the WIFI and Ethernet, it also talks to the ATmega32u4 and provides access to those functions.
By letting the linux side handle the heavy load, you can free up the ATmega to do with it does best, and that is control.
You need to use the Arduino 1.5.0 or better IDE - this provides some additional libraries for use with the Yun and the Due, it also will self discovery a Yun on the wifi so it can be programmed over WIFI using the standard IDE.
The Bridge library facilitates communication between the two processors, giving Arduino sketches the ability to run shell scripts, communicate with network interfaces, and receive information from the AR9331 processor. The USB host, network interfaces and SD card are not connected to the 32U4, but the AR9331, and the Bridge library also enables the Arduino to interface with those peripherals.
General Specifications:
AVR Arduino microcontroller
|
Linux microprocessor
| |
Microcontroller
|
ATmega32u4
|
Atheros AR9331
|
Digital I/O Pins
|
20
| |
PWM Channels
|
7
| |
Analog Input Channels
|
12
| |
Flash Memory
|
32kB (4kB used by bootloader)
|
16MB
|
SRAM
|
2.5KB
| |
EEPROM
|
1K
| |
Clock Speed
|
16Mhz
|
MIPS @400Mhz
|
Operating Voltages
|
5v
|
3.3v
|
Ethernet
|
IEEE 802.3 10/100mbit
| |
Wifi
|
IEEE 802.11b/g/n
| |
USB Type A
|
2.0 HOST
| |
Card Reader
|
Micro-SD only
| |
RAM
|
64MB DDR2
| |
Operating System
|
Open-WRT-Yun
| |
The Atheros AR9331 is typical used in off the shelf routers, most of those can be re-flashed with the OpenWRT-Yun firmware, but of course you’d have to had the AVR side of things.
The power pins are as follows:
- VIN. The input voltage to the Arduino board. Unlike other Arduino boards, if you are going to provide power to the board through this pin, you must provide a regulated 5V.
- 5V. The power supply used to power the microcontrollers and other components on the board. This can come either from VIN or be supplied by USB.
- 3V3. A 3.3 volt supply generated by the on-board regulator. Maximum current draw is 50 mA.
- GND. Ground pins.
- IOREF. The voltage at which the i/o pins of the board are operating (i.e. VCC for the board). This is 5V on the Yún.
IT is very important to not exceed the 5v limit of this board! It will not handle other voltages like other Arduino Boards.
Information about Memory -
The memory on the AR9331 is not embedded inside the processor. The RAM and the storage memory are externally connected. The Yún has 64 MB of DDR2 RAM and 16 MB of flash memory. The flash memory is preloaded in factory with a Linux distribution based on OpenWrt called OpenWrt-Yun. You can change the content of the factory image, such as when you install a program or when you change a configuration file. You can return to the factory configuration by pressing the "WLAN RST" button for 30 seconds.
The OpenWrt-Yun installation occupies around 9 MB of the 16 MB available of the internal flash memory. You can use a micro SD card if you need more disk space for installing applications. Follow the procedure described in this tutorial:
So more space then the Arduinos/AVRs but not much, using a SD card is the best option.
The yun has 5 external interrupt pins! but 3 of the 5 are tied to the AR9331 processor and are not recommended to be used. Which leaves 2 interrupts like the UNO
SPI: on the ICSP header. These pins support SPI communication using the SPI library. Note that the SPI pins are not connected to any of the digital I/O pins as they are on the Uno, They are only available on the ICSP connector. This means that if you have a shield that uses SPI, but does NOT have a 6-pin ICSP connector that connects to the Yún's 6-pin ICSP header, the shield will not work.
The SPI pins are also connected to the AR9331 gpio pins, where it has been implemented in software the SPI interface. This means that the ATMega32u4 and the AR9331 can also communicate using the SPI protocol.
What this also means is some shields will work, some will not - I think that shields like SD card reader, ethernet and wifi would not work, but are provided for on the Yun in other methods.

There are 3 reset buttons with different functions on the board:
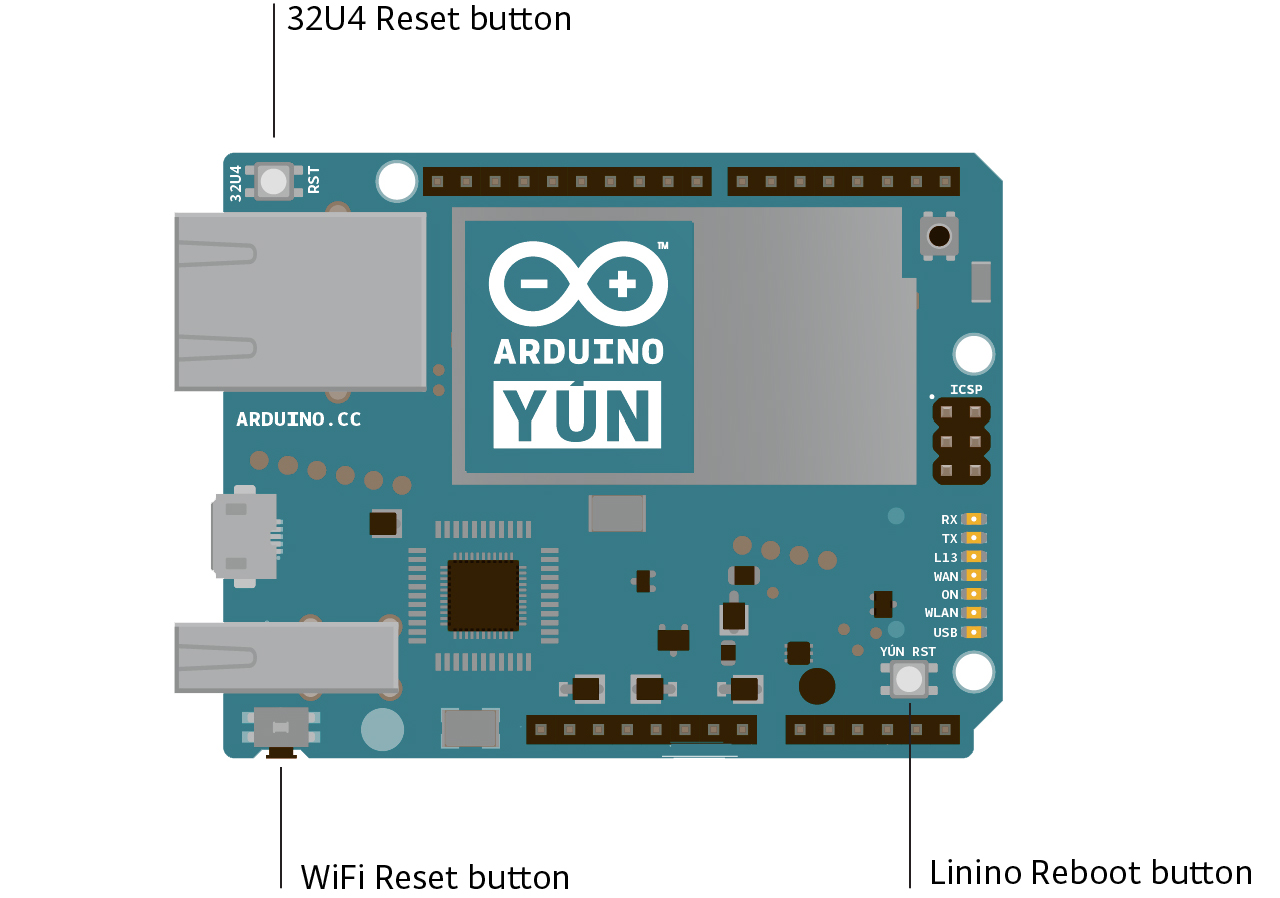
- Yún RST. Bring this line LOW to reset the AR9331 microprocessor. Resetting the AR9331 will cause the reboot of the linux system. All the data stored in RAM will be lost and all the programs that are running will be terminated.
- 32U4 RST. Bring this line LOW to reset the ATmega32U4 microcontroller. Typically used to add a reset button to shields which block the one on the board.
- WLAN RST. This button has a double feature. Primarly serves to restore the WiFi to the factory configuration. The factory configuration consist to put the WiFi of the Yún in access point mode (AP) and assign to it the default IP address that is 192.168.240.1, in this condition you can connect with your computer to the a WiFi network that appear with the SSID name "Arduino Yun-XXXXXXXXXXXX", where the twelve 'X' are the MAC address of your Yún. Once connected you can reach the web panel of the Yún with a browser at the 192.168.240.1 or "http://arduino.local" address. Note that restoring the WiFi configuration will cause the reboot of the linux environment. To restore your WiFi configuration you have to press and hold the WLAN RST button for 5 seconds. When you press the button the WLAN blue LED will start to blink and will keep still blinking when you release the button after 5 seconds indicating that the WiFi restore procedure has been recorded. The second function of the WLAN RST button is to restore the linux image to the default factory image. To restore the linux environment you must press the button for 30 seconds. Note that restoring the factory image make you lose all the files saved and softwares installed on the on-board flash memory connected to the AR9331.
Communication
The Yún has a number of facilities for communicating with a computer, another Arduino, or other microcontrollers. The ATmega32U4 provides a dedicated UART TTL (5V) serial communication. The 32U4 also allows for serial (CDC) communication over USB and appears as a virtual com port to software on the computer. The chip also acts as a full speed USB 2.0 device, using standard USB COM drivers. The Arduino software includes a serial monitor which allows simple textual data to be sent to and from the Arduino board. The RX and TX LEDs on the board will flash when data is being transmitted via the USB connection to the computer.
Digital pins 0 and 1 are used for serial communication between the 32U4 and the AR9331. Communication between the processors is handled by the Bridge library.
A SoftwareSerial library allows for serial communication on any of the Yún's digital pins. Pins 0 and 1 should be avoided as they are used by the Bridge library.
The ATmega32U4 also supports I2C (TWI) and SPI communication. The Arduino software includes a Wire library to simplify use of the I2C bus; see the documentation for details. For SPI communication, use the SPI library.
The Yún appears as a generic keyboard and mouse, and can be programmed to control these input devices using the Keyboard and Mouse classes.
The onboard Ethernet and WiFi interfaces are exposed directly to the AR9331 processor. To send and receive data through them, use the Bridge library. To configure the interfaces, you can access the network control panel as described in the getting started page.
The Yún also has USB host capabilities through OpenWrt-Yun. You can connect peripherals like USB flash devices for additional storage, keyboards, or webcams. You may need to download and install additional software for these devices to work. For information on adding software to the AR9331, refer to the notes on using the package manager.
More information on the YUN can be found here:
and
This weeks project was a Datalogger using the Yun and Dropbox.
and I was able to get this to work, but it was a little flaky - and only updated Dropbox a couple of times. The instructables also had a few issues with setting up the dropbox api, in the end I got my token from dropbox directly, but I think that is why it only worked once or twice. The python script running on the Yun changed the access token given by dropbox.
What this was suppose to do what to take 3 analog inputs, format a text file, save the file on the SD card, and upload the file to dropbox. The idea would be if you needed to remote monitor something that had internet access at that location. You could get your data right in your dropbox, with out going to the remote location. While saving the data on the SD card in case you couldn’t connect to dropbox.
Good idea, a little funky to setup and the instructions missed something, somewhere.
The pythoncode also points to a location other then what the instructables says, the arduino code also has the wrong location in it, all an easy fix - either rename the directory, or change the locations in the programs and python script. But it is confusing if you aren’t use to using linux, or linux from the command line, or a really striped down version of linux.
Here is a little more on the idea:
So I set out to find something that might be a little more useful, at least to us.
I found this.
I followed this tutorial to the tee, and it worked first time. Again there is a couple of confusing things in the tutorial, it looks like maybe they updated the arduino code, and python code, but didn’t update the tutorial. All in all thou it was easy enough to figure out the changes.
I also changed from using a PIR sensor to just a push-button… I figured for our demo a push-button would make more since, and wouldn’t be triggering all the time.
I tried 3 different web-cameras in the end the one like they used is what ended up working.
They have a list of camera that will work. Generally newer camera will, older ones maybe but probably not. The camera needs to support UVC (this is a universal video class driver or USB video class driver) it’s a standard now used by most new camera so they don’t require additional software to work. Most older cameras did require some type of software/driver to work, and these will not work.
Both this and the previous program but really do the same thing - upload a file to dropbox. The main difference is this one uses Temboo as an intermediary to dropbox - what this really means it is a little slower, but not too bad.
We did something like this last week with the ultrasonic sensor trigger - using two services as intermediary between the arduino and the tablet/notification
Same idea, and the setup is going to be somewhat similar, thou it’s a little more involved.
Dropbox uses a authentication scheme called OAuth 2.0 - OAuth uses what are called tokens.
In order to let something or someone else have access to your dropbox account you need to generate these tokens, the tokens need to be valid and re-verified each time they are used.
Normally this is a 2 or 3 step process. OAuth and OAuth 2.0 are pretty much standard now for outside apps to have access to your information without sharing a password between them.
Generally tokens are expire after a period of time and have to be reauthorized or regenerated.
When you setup your account to let the Yun talk to it - you’ll get two codes, that need to be put in the Temboo site that will end up generating the token. (confused yet?)
Using the two keys, temboo will ask dropbox for your ok to use the dropbox service, dropbox will generate a temporary normally one time use token, that tells temboo “yes” or “no” - temboo will generate 3 more tokens based off the two codes (public key, and private/secret key) and the new temporary token. IT passes all of that information back to dropbox, if dropbox likes what it sees it will generate a token that can be used to put files in your dropbox.
(Still confused?)
Temboo will also generate a couple of tokens/keys we need for the Yun’s python script. We will be talking to Temboo, Temboo will be talking to Dropbox on our behalf.
What we are going to do is take a picture, put that picture on the SD card, send that picture to Temboo, Temboo will present our dropbox token to dropbox (dropbox probably at this point will generate a new token and give the new token back to Temboo if the pass was successful) Temboo will forget the old token and store the new one. If all is successful, a picture will show up in your “APP” folder on dropbox.
That all happens within seconds of the picture being taken.
The previous demo we did using the ultrasonic sensor used an authorization method called REST, RESTful apis are generally easier to use the oAuth apis, but are also generally speaking less secure.
And for the most part sites that provide oAuth/oAuth 2.0 don’t like sites that provide a RESTful api gateway to them. There are some exceptions of course.
Twitter shutdown a couple of sites that were still providing a REST api to twitter gateway, forcing developers to use oAuth2.
Microcontrollers don’t handle oAuth/oAuth2 very well, it’s complicated and needs to have two way communication between the device and the website. Although it can be done, it’s not easy to do. Where RESTful api normally will response will an ack or a fail message, it doesn’t need the back and forth of Token ok, send, here’s a new token, etc. Most microcontrollers handle RESTful apis much easier, most of the time you don’t even really care for the ack or failure message.
oAuth/oAuth 2.0 generally are used in web apps that talk to each, where RESTful apis generally can be used from any type of app, or even from the command line.
The Internet of Things sites are geared more to microcontrollers and make it easy for the microcontrollers to talk to the websites.
So let’s get back to the tutorial, the hardest part is setting up the APIs, but now that you have a small understanding of what is going on, it should make some since when you get to that step.
(But this is also where the Adafruit Tutorial departs abit from what you’ll see on the screen) Things do change over time, generally speaking they are easy enough to figure out.
Remember The YUN is really two controllers in one package - we need to setup the linux side of things, you’ll probably remember from the BBB and rPi demos the command line, and SSHing into them.
We are going to do the same thing, this time we need to install some software that will talk to the camera on the USB, we also need to make sure python is installed.
Python - is a common scripting language
python is small and powerful, and is fairly easy to use and learn which makes it a good choice for the Arduino team, and this processor. You could also use C or some other common language, but those are quite a bit larger, and remember there is not a lot of memory on the linux side of things, so small is better.
Open Wrt-Yun is a opkg based linux distro, which also means it’s small and light weight, perfect for this processor.
Adafruit will have you take a test picture, remove the SD card and see if that picture worked, I can tell you right now, with my camera it didn’t work. and I had to make some changes at this point to get the camera to write a jpg image vrs a png image.
What they want you to do is type:
fswebcam test.png
which should turn the camera on take a picture and write a file called test.png
What you’ll want to do is:
fswebcam --jpeg 95 test.jpg
This is what worked for me, and I modified the arduino sketch to do the same thing, more on that later.
You will need to put the Temboo library on the SD card, this make talking to the Temboo API easy to do with a microcontroller, and you’ll also need to put the “upload_picture.py” in the root directory of the SD card
This python script will need to be modified with some information you setup in the API set.
open the file up in your note pad and look for these lines:
# Set inputs
uploadFileInputs.set_AppSecret("yourAppSecret")
uploadFileInputs.set_AccessToken("yourAccessToken")
uploadFileInputs.set_FileName(str(sys.argv[1]))
uploadFileInputs.set_AccessTokenSecret("yourTokenSecret")
uploadFileInputs.set_AppKey("yourAppKey")
uploadFileInputs.set_AppSecret("yourAppSecret")
uploadFileInputs.set_AccessToken("yourAccessToken")
uploadFileInputs.set_FileName(str(sys.argv[1]))
uploadFileInputs.set_AccessTokenSecret("yourTokenSecret")
uploadFileInputs.set_AppKey("yourAppKey")
yourAppSecret - this is comes from Dropbox - it’s called Secret Key or something like that
yourAccessToken - this comes from Temboo/Dropbox (it’s generated and appears on the final screen)
yourTokenSecret - this comes from Temboo/Dropbox (it’s generated and appears on the final screen of api setup)
yourAppKey - this comes from Dropbox
Above these lines you’ll also see this:
session = TembooSession('yourSession', 'yourApp', 'yourKey')
yourApp and yourKey both come from temboo
yourSession - what AdaFruit is calling yourTembooName - this is the name of your Tempboo App
be sure to save the file, and you can close notepad.
So let’s look at the Arduino side of things:
// Sketch to upload pictures to Dropbox when motion is detected
#include <Bridge.h>
#include <Process.h>
// Picture process
Process picture;
// Filename
String filename;
// Pin
int pir_pin = 8;
// Path
String path = "/mnt/sda1/";
void setup() {
// Bridge
Bridge.begin();
// Set pin mode
pinMode(pir_pin,INPUT);
}
void loop(void)
{
if (digitalRead(pir_pin) == LOW) {
// Generate filename with timestamp
filename = "";
picture.runShellCommand("date +%s");
while(picture.running());
while (picture.available()>0) {
char c = picture.read();
filename += c;
}
filename.trim();
filename += ".jpg";
// Take picture
picture.runShellCommand("fswebcam " + path + filename + " --jpeg 95 -r 1280x720");
while(picture.running());
// Upload to Dropbox
picture.runShellCommand("python " + path + "upload_picture.py " + path + filename);
while(picture.running());
}
}
Bridge.h and Process.h both let the AVR side talk to the Linux side, so it’s important to include these. They let you make files, talk to the time clock, talk to the WIF/Ethernet, etc.
You’ll notice that in this sketch, some things look a little bit like python, there are some file names, and paths to directories. Ultimately these are variables. and will be used to pass information to the python script.
Bridge.begin(); - this starts the serial bridge so the two processors can talk to each other.
I hooked a push button up in place of the PIR, the button is active LOW, so I changed the state that the sketch is looking for, normal arduino stuff. Here!
the process library provides a way to run shell commands on the linux side of things. This is very cool, and what this does is lets you use the AVR side of things like it is at the console, able to get access to the hardware on the linux side.
you’ll notice that the process library command is runShellCommand()
the command inside the quotes has to be a valid linux command and in the right format, there is nothing that I see that will give the AVR side a error if this fails...so it has to be right.
We get the date, the date will be used for the filename of the picture.
Next we take the picture - again, we are going to use the runShellCommand, but this time we are going to call the program fswebcam, remember we tested our webcam using this on the command line. and you can see in my sketch, I made the changes needed to make it grab a jpg image.
and finally - we call the upload_picture.py script - using runShellCommand()
The upload_picture.py script we looked at a little bit - it handles talking to Temboo, and Dropbox
The last thing the tutorial does is explain streaming video, I did not try to stream to youtube, as that requires a couple extra pieces of software. That I didn’t want to install for this demo. I don’t see this as being that useful for streaming live video. Although it worked a whole lot better then I thought it would.
What you need to do is ssh back into the YUN, and type
mjpg_streamer -i "input_uvc.so -d /dev/video0 -r 640x480 -f 25" -o "output_http.so -p 8080 -w /www/webcam" &
This will setup a min-webserver that runs right on the Yun, (it’s doing quite a lot here really), and the web site it setups demos a couple of different types of streams this can do.
So in my mind a much better demo.
One draw back that I saw from this was it stops talking to the AVR side, so in order to get back to just pictures - both sides (AVR and Linux) need to be reset. That was really the only drawback I saw.
And I don’t see why you couldn’t set this up and open a port on your router to watch this from the outside world, with out using youtube or another streaming service.
No comments:
Post a Comment