July 17, 2014 Using the Raspberry PI with a Console Cable/via SSH/and VNC
This is Lesson 5, 6, 7 from the Adafruit Learn Raspberry PI series. Basicly this is how to control the PI without a keyboard or a mouse. And how to use the PI over a network.
The SSH & VNC will work with most linux distros. VNC will work (with the right software on Windows). The Console Cable is nothing more then a 3.3v USB to Serial device.
THE VOLTAGE LEVELS ARE WHAT IS IMPORTANT HERE! REMEMBER THE PI is ONLY 3.3v logic levels
The console cable is a PL2303 Drivers for windows can be found here:
The cable has 4 wires, at first look you would think this was/is a breakout cable for USB, it’s not, and can’t be used like that.
As long as the logic levels are 3.3v, any USB to Serial can be used. My console cable will be a FTDI programmer board that has voltage switchable levels.
It turns out the CP2102 (a lesser known, but widely available chip/board from China) also appears to be 3.3v but that is unverified, it does have a 3.3v voltage regulator built into the chip, and a couple of websites say that the levels are 3v levels, but a couple of others say the levels are selectable. The bottom line is, if you aren’t sure, don’t use the cable, the rPI is very intolerant of the wrong voltages.
Speaking of that, DO NOT power from the cable and from USB at the same time, ONE or THE OTHER, BUT NOT BOTH - YOU WILL DAMAGE YOUR BOARD, YOU HAVE BEEN WARNED.
So the PI is not very voltage friendly, kind of weird when you think about how students are, and just randomly hooking things up.
So what do you need to make the cable work?
Easy - Some type of terminal program. The recommended program for both Mac OSX and LInux is something called “SCREEN”, it should already be installed on the Mac, but may or may not be installed on your linux distro.
For Windows the recommended program is “PUTTY” http://www.putty.org - Putty is an execuatable, and doesn’t need to be installed.
Hyperterminal Should also work, thou it’s not the best terminal program, and may or may not be installed on your Modern Windows machine - if not you’ll have to download and install it (IF you really want to do that)
I personally use a program called “Serial Port Terminal” on my linux machines, and you can find it in the repository for your distro. Modern Linux Distros have limited the user from access to the serial ports (both real, and virtual) Linux Mint has done this I can verify that, and I have read that a few others have as well.
There is a simple fix for this, You will need to add yourself to the “Use Modems” group. From the Admin menu, find User setting, click on advanced settings, put your password in to give the setting program root access, next click on the user privileges tab, and find “Use Modems” put an “X” click ok, click close, and reboot your system. You should now have access to the Serial ports. I’d recommend PUTTY thou, since it will also do SSH which is a little later in this series.
One other way, is to run the “SCREEN” or “Serial Port Terminal” as root, this a pain in the butt thou. but does work.
For Mac and Windows you’ll probably also need drivers for you FTDI/Cable/USB to Serial device (Mac may or may not have most built in) - For the most part Linux handles the USB to Serial Devices without problems and doesn’t need drivers.
Next we need to hook your “cable” up to the rPI
Remember, only use one POWER source at a time with the rPI - I can’t say this enough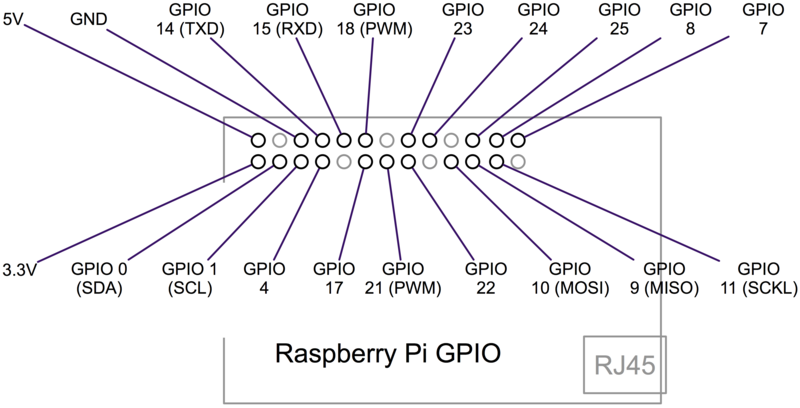
So as you can see Pin 1 is 5v +
Pin 3 is GRD
Pin 4 is TX
and Pin 6 is RX
So if you have the cable, Red to Pin 1, Black to Pin 3, White to Pin 4, Green Pin 6
In general, if you are not using the cable, The RX Pin on your Board would goto the TX pin on the PI, The TX pin on your board would goto the RX pin the PI.
Know your board, there are some of the cheap boards from China that are silk screened backwards, (in otherwords on those boards, TX to TX, RX to RX), the boards are wrong. But if it doesn’t work, it might mean that you have one of those wrong silk screened boards.
That’s it, start up your terminal program, and connect it to the “USB serial port” At a baud rate of 115200 (It should also be 8N1 - what don’t remember 8N1? 8 Bits, no parity, and 1 Stop Bit) This is a defacto standard. You might also see a “Flow Control” this should be none.
What will happen is you have just connected to your rPI via a serial connection, and you will be asked for a username and password, you’ll be at the command prompt, and from there you can do a lot of different things. In fact in my past two demos we spent more time on the command line then in the GUI, so it’s a very powerful thing.
The rPI’s default user is “PI” and the default password is “raspberry”
That covers lesson 5, Next we will SSH into our rPI.
SSH is a “Secure Shell” - unlike what we did above, this is done over the network.
Building on the old insecure Telnet protocols.
What we did above is simple connect to the PI via serial, SSH takes that one step further, SSH is incredibly powerful and very secure. It encrypts your connection, exchanges “keys” and verifies you are connected to where you think you are connected.
This is one of the best ways to remote control your rPI.
To set this up we need to go back into the Raspberry PI config tool.
In the terminal (on the PI) type “sudo raspi-config”
Find SSH in the menu, and you’ll want to enable it, after a few seconds of setup, you should get a message that the SSH Server is enabled.
Next we need to find the IP address of the rPI in the terminal (on the PI)
type “sudo ifconfig” - I’m not sure the sudo is really needed here, but this is what Adafruit says.
We need to know which adaptor we are using (in our case we are hard wired - so it’s going to be eth0) But if you are wireless it’s going to wlan0
You are looking for the line that reads “inet addr” and you should see something like
192.168.1.xx
Just make a note of this, you’ll need it again.
Both Mac and Linux - have a SSH client built into them, both work the same way.
on the computer you want to use to connect to your PI open the terminal and type
ssh 192.168.1.xx -l pi
So here you are invoking the SSH client, and telling it that the user name is going to pi. IF all goes well and if this is the first time you’ve connected (or if the IP address of the PI has changed) You will see a warning about connecting to an unknown host, and asked about exchanging the keys.
After that, you’ll be asked for a password.
And you’ll be on the command line again!
Windows doesn’t have a SSH client installed from default, but we just downloaded Putty, and Putty can do SSH.
We are going to open the Putty configuration, type the IP in the Host Name, and select SSH for the connection type.
Again, if it’s the 1st time or if the IP address has changed, you’ll get a Security Warning, and ask if you want to add the KEYs.
You will be asked for a user name at this point, and then password - you’ll be at the command prompt again.
Troubleshooting if there is an error:
Generally speaking, SSH is very fast, and very secure, however sometimes the keys do need to be regenerated. So you need to reconfigure the rPI.
on the command line type:
sudo rm /etc/ssh/ssh_host_*
This will remove the old keys, next type
sudo dpkg-reconfigure openssh-server
That should fix most problems, you will get a warning again on the machine you are using to connect to the PI.
Lesson 6 complete, So From the serial connection, command line, we were able to start the SSH server, find the IP address. And move to the advance connection of SSH.
In both cases, we used the command line, next we will be using VNC to connect to the rPI.
VNC (or Virtual Network Computing) is a way to connect via the network and use your desktop. With full Keyboard and Mouse operation. VNC is also a way to connect to the PI securely.
Taking what we learned from Lesson 6, we are going to install the VNC server from the command line.
So first we need to SSH into the rPI, next we need to install a VNC server.
sudo apt-get update
sudo apt-get install tightvncserver
after the install is done, we will want to start the server.
Type:
vncserver :1
Next we need to set a password, let it know if we want full control, or just to view.
So the server is now running, but we need a VNC client on our other computers.
There are a number of VNC clients:
Real VNC, Tight VNC, Tiger VNC, Ultra VNC
in linux, there is Vinagre (Which also does other protocols including SSH) and is my personal favorite.
With some minor differences, any VNC client will connect to any VNC server (Yes, there are few that will not, most of those are commerical products that have made major changes to the VNC protocols) Some VNC servers will also let you connect with a modern browser (normally you have to turn this on in you server, and it’s normally a strange port number) But in this case you don’t need a client you already have one.
It appears that Mac OSX has a native VNC viewer - and from the Finder select connect to server and type in “vnc://192.168.1.xx”
So we can now connect to the rPI with VNC and see the Desktop - but what happens if the rPI looses power or reboots? The VNC Server was started from the command line, and will not restart. For that we need a little more configuration on the PI.
This will only work if you have your PI setup to boot into the Desktop.
Adafruit has you SSHing into the PI again - hmmmm, Aren’t we still connected with VNC? Can’t we just open the terminal from VNC? Yes, I think we can.
Either way, you need to get to the command prompt, what we are going to do is setup a autostart file, and tell the server to start up after the desktop loads.
From the command line, type:
cd /home/pi
cd .config
(In Linux a period in front of a file name will hide that file, it’s used a lot for configuation files, and configuration directories a ls -a command will still show those files)
now we need to make the autostart directory:
mkdir autostart
cd autostart
(Now we make a new configuration file)
nano tightvnc.desktop
(Nano is a text editor, it’s sort of like word pad, or VI, but it’s much more friendly then VI)
So now we are going to type the configuration:
[Desktop Entry]
Type=Application
Name=TightVNC
Exec=vncserver :1
StartupNotify=false
Hit “Ctrl-O” save the file, Hit “Ctrl-X” to exit nano
So that takes care of Lesson 7, and now we have full access to the GUI Desktop, full mouse and keyboard usage, and still have the ability to use the command line of the rPI.
VNC maybe more then what is really need for most applications, when the PI does appear to be very command line driven.
The concepts of these 3 lessons is not limited to just the rPI. SSH & VNC are used quite a bit in both the Linux and Windows worlds. Serial connections while not used as much can still be used with Linux, and is still used for some industrial machines. (Serial maybe slow, but it’s reliable, and in some cases it is the best choice for connecting to other machines)
July 13, 2014 This week we are going to do the failed Raspberry PI demo
And then we will do a rPI mini-series of 6
Demos following the Adafruit Tutorials, and the document below.
See the demo for July 6, 2014 below, for much more info.
UPDATE: Apr 7, 2015 - This demo was done about a year ago, it was with A Raspberry PI B - since doing this, there have been additions to Raspberry PI - such as the B+, and B 2 (It's being offered for Historical reasons)
No comments:
Post a Comment