Generic 2.2” TFT Screen w/buttons and IR INFORMATION
Or What I learned about the Chinese TFT Screens for Raspberry PI 2 and 3
1st Here is the screen I bought from eBay:
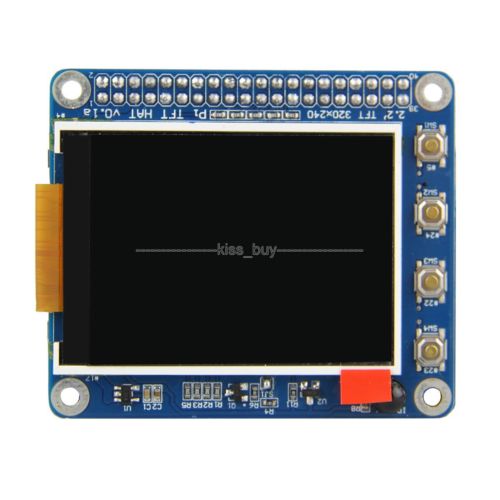
2.2"TFT Screen LCD Display HAT 320x240 for Raspberry Pi 3/2 w/Buttons IR Sensor
Features:
This auction is for a 2.2 inch screen with buttons and IR function for Raspberry Pi 3 and 2 Model B.
Details:
Screen sizing 2.2 inch and supporting a 320x240 resolution with high PPI, being small but able to provide a fine image.
Size: 65mm×56.5mm, standard as a Raspberry Pi HAT board.
Multi-button design: 6 buttons, meeting different demands for buttons from various users
With an Infrared receiver.
Quick-responding technical support for free.
Introduction:
The 2.2 inch screen is a standard Raspberry Pi HAT (hardware attached on top). It supports a 320x240 resolution with high PPI.
Though small, it can display any images clearly. With the 6 buttons on the board, you can define their functions by yourself. And an
Infrared receiver is equipped so you can control the screen remotely.
|
- Like Most cheap things, there isn’t documentation provided, and you have to search
- Also like most cheap things there is a lot of just plain miss leading information.
The key to this display appears to be the fact that it has IR on it. Once I searched “w/IR” I was able to find the same display being sold by Sunfounder (for a liTTYe bit more then you can find on eBay).
Sunfounder provides a Raspberry PI Image and a/or a Python script for setting up the LCD.
(Plus information on how to get the buttons working/IR working)
Their image is based on Raspbian Jessie, and the current OS is Raspbian Pixie
So If you already have a working install (which I did) use the python script to add the needed files and information to your install.
1st thing I learned even the instructions are not quite right. You need to run the python script from the CLI (command line), and as ROOT (sudo).
I answered all the question with the default entries or “y” for yes.
The system rebooted, and the screen (after a liTTYe while) did start to display, and even displayed the “X” server (Thou, my screen is a liTTYe small to use the GUI effectively).
What was a disappoint was it shut the HDMI off and I didn’t get a GUI on it.
But by hitting “CTRL-ALT-F2”, “CTRL-ALT-F4”, and “CTRL-ALT-F6” I was able to get to the command line.
*It was at this point I shutdown the system, unplugged the display, and hoped that it would switch back to HDMI - it did not *
I was still able to get to TTY2,TTY4 and TTY6 - so I could fix the issue from the command line.
Once again I started to google the problem - and once again I can across many people who had the same problem, and a dozen different answers.
Finally I came across this post on Stackexchange
https://raspberrypi.stackexchange.com/questions/2169/how-do-i-force-the-raspberry-pi-to-turn-on-hdmi
This answer is what worked:
Although this question is very old, I would like to post my answer that I found recently. I am running Raspberry PI 2 Model B with 2.8 PiTFT capactive display. Once I figured out how to get my pitft display to work with Raspberry PI, I could not get Raspberry PI to switch over to HDMI output no matter what I did. Then, I came across this information, which worked for me.
There's two ways to do it. In older Pi installs, use the fb0 framebuffer when you want to display stuff on the HDMI/TV display, for example: FRAMEBUFFER=/dev/fb0 startx will use the HDMI/TV framebuffer for X windows instead of the PiTFT
On Jessie Pi installs, run sudo nano /usr/share/X11/xorg.conf.d/99-fbdev.conf to edit the configuration file and make sure it contains: Copy Code
Section "Device"
Identifier "display"
Driver "fbdev"
Option "fbdev" "/dev/fb0"
EndSection
change the Option "fbdev" "/dev/fb0" line to Option "fbdev" "/dev/fb1" if you want the xdisplay on the PiTFT or fb1 to fb0 for HDMI output.
Update: If don't see the code above in the file, then simply copy and paste what is shown in this answer at the bottom of that file. If you can't find 99-fbdev.conf file in that folder, then there is probably another file with different name like 10-evdev.conf in the same folder which you will have to modify to make it work as described above.
| |||
The file in /usr/share/X11/xorg.conf.d/ did not exist, and I had to create it.
I didn’t make any other changes or anything to any of the other config files.
Rebooted the system, and sure enough I had X running on the HDMI again.
The TFT screen did boot, but came to a blank screen with a flashing cursor.
** What I learned **
1 It seems TTY1 is on the TFT screen, but linked to X running on the HDMI (in other words what you do in that session seems to have direct effect on X)
2 TTY2, TTY4, TTY6 appear to work on the HDMI
3 “CTRL-ALT-F7” is the X screen on HDMI
4. TTY3, TTY5 appear to work on the TFT screen
5. If you try to start X from TTY1,TTY3,TTY5 the system locks up and displays a bunch of error messages. Which is fine, X on that small screen was not great anyway.